Proxmox
Hypervisor PVE
- Remove Proxmox Subscription Notice
- Remove Node from Cluster
- Install FreeNAS Initiator
- Reset SSL Certificate
- Resize VM Disk
- Choose boot Kernel
Remove Proxmox Subscription Notice
Whenever a Proxmox node is updated we need to remove the subscription notice, as it gets overwritten during the upgrade process. I do this only as a time-saving method.

Option 1
1. Change to the working directory
cd /usr/share/javascript/proxmox-widget-toolkit2. Make a backup
cp proxmoxlib.js proxmoxlib.js.bak3. Edit the file
nano proxmoxlib.js4. Locate the following code (Use ctrl+w in nano and search for “No valid subscription”)
5. Find the following line to edit
.data.status.toLowerCase() !== 'active') {and change the not (!) operator to look like the following
.data.status.toLowerCase() == 'active') {
6. Restart the Proxmox web service (also be sure to clear your browser cache, depending on the browser you may need to open a new tab or restart the browser)
systemctl restart pveproxy.serviceOption 2
1. Change to the working directory
cd /usr/share/javascript/proxmox-widget-toolkit2. Make a backup
3. Edit the file
nano proxmoxlib.js4. Locate the following code (Use ctrl+w in nano and search for “No valid subscription”)
Ext.Msg.show({
title: gettext('No valid subscription'),
5. Replace “Ext.Msg.show” with “void”
void({ //Ext.Msg.show({
title: gettext('No valid subscription'),
6. Restart the Proxmox web service (also be sure to clear your browser cache, depending on the browser you may need to open a new tab or restart the browser)
systemctl restart pveproxy.serviceAdditional Notes
If you ever need to revert back you can either copy the backup file and replace the edited version or reinstall the WebKit
Revert from backup:
mv proxmoxlib.js.bak proxmoxlib.jsReinstall Webkit:
apt-get install --reinstall proxmox-widget-toolkitRemove Node from Cluster
Introduction
These are the steps if a node needs to be removed entirely from the cluster and function as a single node
Steps
- Remove or mitigate all VMs and containers from nodes that will be decommissioned
- Create a ZFS snapshot of rpool and rpool/data on the single node
- Delete the nodes that will be decommissioned
- Remove the cluster config
- (Optional) Disable cluster/HA services
Snapshot
zfs snapshot rpool@<date>
zfs snapshot rpool/data@<date>
Turn off the decommissioned node
Remove the decommissioned nodes from the single node
pvecm delnode <nodename>Run the following to delete the cluster and create a single node
It may be best to run this line by line to see the output.
systemctl stop pve-cluster corosync
pmxcfs -l
rm /etc/corosync/*
rm /etc/pve/corosync.conf
killall pmxcfs
systemctl start pve-cluster
(Optional) Disable cluster/HA services
systemctl disable --now pve-ha-crm pve-ha-lrm corosync.serviceInstall FreeNAS Initiator
When the cluster is used a convergent model with TrueNAS, the patches need to be installed for the FreeNAS Initiator to show under the storage dialogue
Option 1
Connect to each node and install the following keys
curl https://ksatechnologies.jfrog.io/artifactory/ksa-repo-gpg/ksatechnologies-release.gpg -o /etc/apt/trusted.gpg.d/ksatechnologies-release.gpg
curl https://ksatechnologies.jfrog.io/artifactory/ksa-repo-gpg/ksatechnologies-repo.list -o /etc/apt/sources.list.d/ksatechnologies-repo.list
Then issue the following to install the package
Line 3 may now be in the code after I put in the GitHub issue. Link
apt update
apt install freenas-proxmox -y
systemctl restart pvescheduler.service
Option 2
This is the manual way to do this. However, I don't do it this way now that there is a package to install. The benefit to the package is that once Proxmox is updated, the TrueNAS configurations are not overwritten.
Let's create the SSH keys on the Proxmox boxes. (The IP must match your iSCSI Portal IP) You only need to create the keys on one node if they are clustered as the keys will replicate to the other nodes.
$portal_ip=192.168.2.252
mkdir /etc/pve/priv/zfs
ssh-keygen -f /etc/pve/priv/zfs/$portal_ip_id_rsa
ssh-copy-id -i /etc/pve/priv/zfs/$portal_ip_id_rsa.pub root@$portal_ip
Enable "Log in as root with password" under Services -> SSH on the FreeNAS box.
Make an SSH connection from every node to the iSCSI Portal IP
ssh -i /etc/pve/priv/zfs/$portal_ip_id_rsa root@$portal_ip
Install the REST client on every node
apt-get install librest-client-perl git
Download the patches on every Proxmox node
git clone https://github.com/TheGrandWazoo/freenas-proxmox
Install the patches on every Proxmox node
These can be run all at once but it is harder to see the output
cd freenas-proxmox
patch -b /usr/share/pve-manager/js/pvemanagerlib.js < pve-manager/js/pvemanagerlib.js.patch
patch -b /usr/share/perl5/PVE/Storage/ZFSPlugin.pm < perl5/PVE/Storage/ZFSPlugin.pm.patch
patch -b /usr/share/pve-docs/api-viewer/apidoc.js < pve-docs/api-viewer/apidoc.js.patch
cp perl5/PVE/Storage/LunCmd/FreeNAS.pm /usr/share/perl5/PVE/Storage/LunCmd/FreeNAS.pm
Restart the PVE services
systemctl restart pvedaemon
systemctl restart pveproxy
systemctl restart pvestatd
If you are using a cluster restart the following services as well.
systemctl restart pve-ha-lrm
systemctl restart pve-ha-crm
systemctl restart pvescheduler.service
Reload the PVE webgui. Now FreeNAS-API should be available as an iSCSI provider.
Reset SSL Certificate
cd /etc/pve/localrename the .key and .pem files for backup
pvecm updatecerts --force
systemctl restart pveproxy
The backup .PEM and .KEY files can be deleted if the web interfaces loads without error
Resize VM Disk
Resizing the guest disk
General considerations
When you resize the disk of a VM, to avoid confusion and disasters think of the process like adding or removing a disk platter.
If you enlarge the hard disk, once you have added the disk plate, your partition table, and file system knows nothing about the new size, so you have to act inside the VM to fix it.
If you reduce (shrink) the hard disk, of course removing the last disk plate will probably destroy your file system and remove the data in it! So in this case it is paramount to act in the VM in advance, reducing the file system and the partition size. SystemRescueCD comes in very handy for it, just add its iso as cdrom of your VM and set boot priority to CD-ROM.
Shrinking disks is not supported by the PVE API and has to be done manually.
Another page (deleted) with overlapping content was Resizing disks | Archive
qm command
You can resize your disks online or offline with command line:
qm resize <vmid> <disk> <size> exemple: to add 5G to your virtio0 disk on vmid100:
qm resize 100 virtio0 +5G
For virtio disks:
Linux should see the new size online without reboot with kernel >= 3.6
Windows should see the new size online without reboot with last virtio drivers.
for virtio-iscsi disk:
Linux should see the new size online without reboot with kernel >= 3.7
Windows should see the new size online without reboot with last virtio drivers.
Enlarge the partition(s) in the virtual disk
Depending on the installed guest there is several diffent ways to resize the partions
Offline for all guests
Use gparted or similar tool (recommended)
In gparted and possibly most other tools, LVM and Windows dynamic disc is not supported
Boot the virtual machine with gparted or similar tool, enlarge the partion and optionally the file system. With som linux clients you often need to enlarge the extended partion, move the swappartion, shrink the extended partion and enlarge the root partion. (or simple delete the swap and partion andre create it again - but remember to activwate the swap agin (last step).
Gparted have some warnings about some specific operations not well supported with windows guest - outside the scope of this document but read the warnings in gparted.
Online for Windows Guests
- Guest is Windows 7, Windows Vista or Windows Server 2008
- logon as administrator and extend the disk and filesystem (Using Disk manager)
- For more info www.petri.co.il/extend-disk-partition-vista-windows-server-2008.htm
- Guest is Windows 10: logon as administrator and extend the disk and filesystem (Using Disk manager). If you do not see the ability to extend the disk (i.e. nothing seems to have happened as a result of using the resize command), go to the Windows command prompt and do a: shutdown -s -t 0 (This is a "normal" shutdown, as opposed to the "fast" shutdown that's the default for Win 8 and onwards.) After a reboot, you'll now see the ability to expand the disk.
Online for Linux Guests
Here we will enlarge a LVM PV partition, but the procedure is the same for every kind of partitions. Note that the partition you want to enlarge should be at the end of the disk. If you want to enlarge a partition which is anywhere on the disk, use the offline method.
- Check that the kernel has detected the change of the hard drive size
(here we use VirtIO so the hard drive is named vda)
dmesg | grep vda

[ 3982.979046] vda: detected capacity change from 34359738368 to 171798691840
Print the current partition table
fdisk -l /dev/vda | grep ^/dev

GPT PMBR size mismatch (67108863 != 335544319) will be corrected by w(rite).
/dev/vda1      34     2047     2014 1007K BIOS boot
/dev/vda2    2048   262143   260096  127M EFI System
/dev/vda3  262144 67108830 66846687 31.9G Linux LVM
Resize partition 3 (LVM PV) to occupy the whole remaining space of the hard drive)
parted /dev/vda
(parted) print

Warning: Not all of the space available to /dev/vda appears to be used, you can
fix the GPT to use all of the space (an extra 268435456 blocks) or continue
with the current setting?

Fix/Ignore? F
(parted) resizepart 3 100%
(parted) quitCheck the new partition table
fdisk -l /dev/vda | grep ^/dev

/dev/vda1      34      2047      2014  1007K BIOS boot
/dev/vda2    2048    262143    260096   127M EFI System
/dev/vda3  262144 335544286 335282143 159.9G Linux LVM
Enlarge the filesystem(s) in the partitions on the virtual disk
Online for Linux guests with LVM
Enlarge the physical volume to occupy the whole available space in the partition:
pvresize /dev/vda3Enlarge the logical volume and the filesystem (the file system can be mounted, works with ext4 and xfs)
lvresize --size +20G --resizefs /dev/xxxx/root #This command will increase the partition up by 20GBlvresize --extents +100%FREE --resizefs /dev/xxxx/root #Use all the remaining space on the volume group
Online for Linux guests without LVM
Enlarge the filesystem (in this case root is on vda1)
resize2fs /dev/vda1Choose boot Kernel
Proxmox comes with a built-in tool called proxmox-boot-tool. We can list the available kernels on the system and choose the best kernel and set it to always boot from this kernel.
List and choose boot Kernel
proxmox-boot-tool kernel list
Example output:
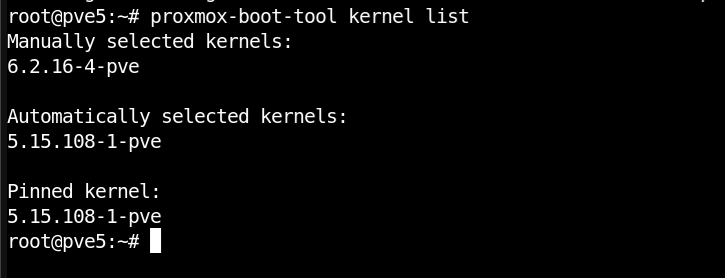
Now that we know which kernel we want we must run the following command and reboot.
proxmox-boot-tool kernel pin 5.15.108-1-pve && reboot
This will pin the kernel we want to use. We may need to unpin a kernel we don't want. The following command can be used to remove a kernel from the pinned list
proxmox-boot-tool kernel unpin 5.15.108-1-pve